

Build Modern Web Applications using ReactJS #1.
Get started with ReactJS

I am a FullStack Software Developper . As part of the learning process , i decide to start sharing with you what i learn on this plateform .
🥳 Hello and welcome! 👋
This is a comprehensive tutorial on developing modern applications using React.
This series of articles aims to be a useful resource for learning React with a solid understanding of its core concepts.
Whether you are a beginner or an intermediate developer, this tutorial covers essential concepts, best practices, and hands-on examples to help you become proficient in React development. By the end, you will have everything you need to build reliable and powerful React applications!
Introduction
There is a problem with front-end development today: it's overwhelming. There are plenty of libraries out there, each doing one little thing. The React ecosystem is guilty of this. There's React, Redux, Webpack, Babel, React Router, etc. Sometimes it is complicated to set things up if you want to start from very very scratch.
There are still several boilerplate projects available to make this easier by grouping a set of choices.
But the opposite happens: instead of being overwhelmed by the choices, you are now overwhelmed by the amount of code that comes for free 😀 with those projects (boilerplate) and you have no idea of what they do 😕.
I came up with another method for learning ReactJS. We will begin by concentrating only on React and its core concepts. Everything else will come when you've understood React.
Without a good foundation in React, studying frameworks like Redux and technologies like Webpack at the same time will just drag down your learning process.
Think of those libraries (frameworks) as layers on a foundation.

No?
Of course not. You are aware that doing so could lead to failure. They would, somewhat counterintuitively, slow things down rather than speed them up.
So, this series of articles will take a different approach; it will first teach you how to use React. We will start with the core concepts of React in isolation, without Redux, Webpack, or anything else. When we achieve that, we will be able to go and learn all of its friends with ease (Redux, Router, etc.). Not only will you be able to learn about those other libraries, but you will also have a solid foundation to embrace them.
Why React?
React is a free and open-source front-end JavaScript library for building user interfaces based on small and reusable components. React was created by Jordan Walke, a software engineer working for Facebook.
ReactJS uses a declarative paradigm that allows applications to be both effective and flexible. It creates simple views for each state in your application and efficiently updates and renders just the right component as your data changes. The declarative approach makes your code more predictable and easier to debug. Each component in a React application is responsible for rendering a separate, reusable piece of HTML code. The ability to nest components within other components allows you to build complex applications from simple building blocks.
Brief history
React.js was designed by Facebook in 2011 for their use. As you may be aware, Facebook is one of the world's most popular social networking sites.
Instagram, a subsidiary of Facebook, started utilizing it in 2012.
React.js was open-sourced by Facebook in 2013. The developer community first rejected it since it combined Markup and JavaScript in a single file. However, as more individuals tried it, they began to embrace the component-centric approach to separate challenges.
Many significant corporations began utilizing React.js in production environments in 2014.
React Native was also open-sourced by Facebook in 2015. It is a package that allows us to use React.js to construct native mobile apps for Android and iOS.
React.js began adopting Semantic Versioning in 2016 with version 15. This also helped to convey to the development community that React was more reliable.
Many Fortune 500 firms utilize React.js nowadays. Facebook has a full-time React development team. They constantly deliver bug fixes, improvements, blog entries, and documentation.
Key benefits of React JS for front-end development
ReactJS has plenty of advantages. Let's look at the main advantages of React JS to discover why it differs from other front-end development frameworks.
Speed
React allows developers to use separate components of their application on both the client side and the server side, which speeds up the development process.
Flexibility
Because of its modular nature, React code is easier to maintain and more adaptable. This flexibility saves organizations a significant amount of time and money.
Performance
React JS was created with performance in mind. The framework's core provides a virtual DOM program and server-side rendering, which allows complicated programs to run exceptionally quickly.
Reusable components
One of the major benefits of utilizing React JS is the ability to reuse components. Developers save time since they don't have to build many codes for the same functionality. Furthermore, any modifications made to one portion of the program will not affect the rest of the application.
React lacks a templating system; you will become more proficient with JavaScript. Instead, React encourages you to develop your user experience using the full power of JavaScript.
You are going to practice using parts of functional programming. You will also be encouraged to use the latest features of JavaScript (including ES6). By not abstracting away data management, React will force you to think about how to architect your app and encourage you to consider concepts like immutability.
With this, I hope you understand why React JS is such a fantastic front-end framework.
So, what are you still waiting for? Let us get started 😋!
Prerequisites
Good understanding of JavaScript, HTML, and CSS.
You will need a modern web browser, such as Chrome, Firefox, etc.
Basics of ReactJS
Today, Single-page applications are becoming popular in front-end web development and are excellent for offering an outstanding user experience.
In the early stages of development, to modify the display or carry out a user activity, it was simply necessary to reload the entire page. This had the drawback of taking a very long time for the entire request to travel from the client to the web server and back.
Single-page applications offer speed, involve a streamlined development process, and consume fewer server resources. Tech giants like Google use single-page applications such as Gmail and Google Maps to delight their users.
But what exactly is a SPA?
What are single-page applications?
A single-page application (SPA) is a single web page, website, or web application that works within a web browser and charges just a single document. It does not need page reloading during its usage, and most of its content remains the same, while only some of it needs updating. When the content needs to be updated, the SPA does it through JavaScript APIs.
This way, users can view a website without loading the entire new page and data from the server. As a result, performance increases, and you feel like using a native application. It offers a more dynamic web experience to users.
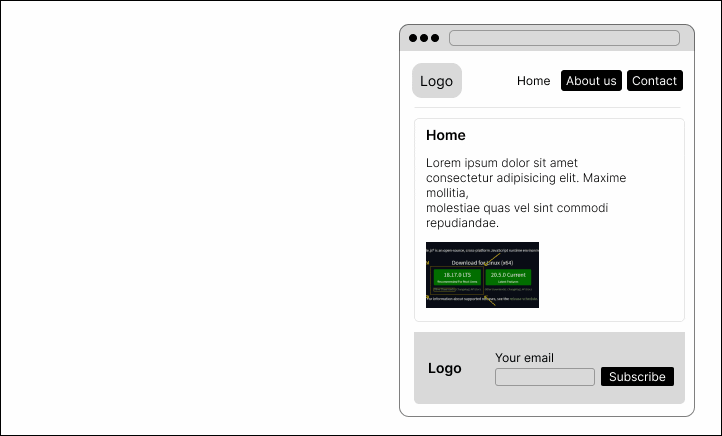
The figures below illustrate the difference between traditional applications and single-page applications:
Fig. 1: Single-page application

Fig. 2: Multi-Multi page application
Imagine that you wish to go to a social media website. Your browser sends a request to a server when you enter its address to get access, and the server responds with an HTML document for the home page. When you click on a button to see more posts, the website reloads the entire page (images, videos, etc.); this affects the performance of the application and the user experience.
But, when using an SPA, the server only transmits the HTML file in response to the first request and delivers JSON data in response to all subsequent queries. Consequently, an SPA won't refresh the entire website but will instead rewrite the content of the currently loaded page. This results in quicker performance and no additional waiting for reloading.
🤨 You may feel like there are a lot of concepts and processes to understand when working with React. No worries, you can be sure that in this series of articles, you will have the opportunity to have a good understanding of and use them 🥳.
This chapter will teach you the fundamentals of React by exploring the concepts of component-based architecture and virtual DOM. At the end of this chapter, we will develop our first React component and have fun with it.
Let us begin with components, one of the core building blocks of React.
Component-based architecture
When Facebook published React, it revolutionized the way front-end developers should build user interfaces. They included the concept of something called component-based architecture.
The major goal was to ensure component and code reuse. A component is a reusable and self-deployable code block that encapsulates the functions and behaviors of a software unit.
What is a component?
A component is a smaller element that makes up a part of the user interface. Think of it like a JavaScript function. But instead of returning a number, a string, an array, etc., it returns HTML (aka JSX).
function Profile () {
    return(
            <div>
                <span>FirstName : John</span>
                <span>LastName : Doe</span>
                <span>Email : exemple@gmail.com</span>
            </div>
          )
}
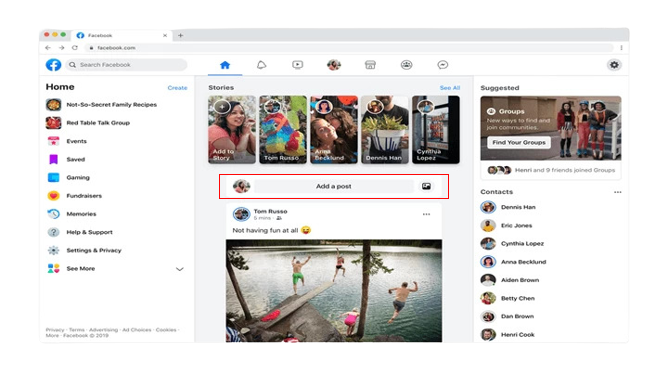
If I were required to explain a component within the context of Facebook's interface, a chat window would be one, a comment feed would be another, a friend list would be another, and so on.
Because they are reusable, we can use one component multiple times and easily insert it wherever needed. This results in components that can exist independently within the same space and interact with each other.

You may design not just a smaller element, but also a stand-alone aspect of a user interface (UI) as a component that can include smaller components.
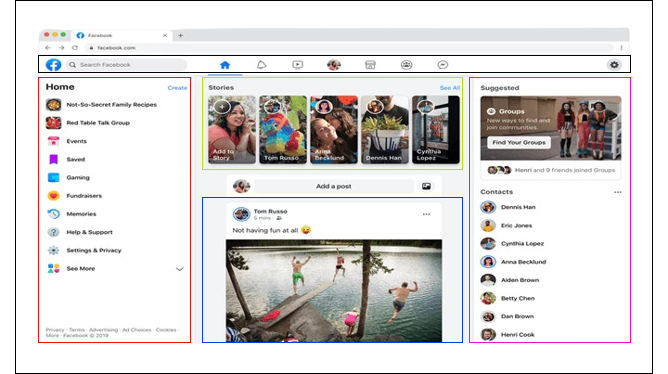
It is important to know that each user interface is composed of simple components that can be combined into more complex components.
As a component is self-contained, it has its own HTML, CSS, and Javascript logic. For example, a payment section component has a javascript function to submit the payment when the submit button is clicked.
Virtual DOM in React
To understand the virtual DOM and why React uses it, let’s first refresh our knowledge of what the actual browser DOM is.
When a user requests a webpage, the browser typically receives an HTML document for that page from the server. The browser then creates a logical, tree-like structure out of the HTML to display the requested page on the client.
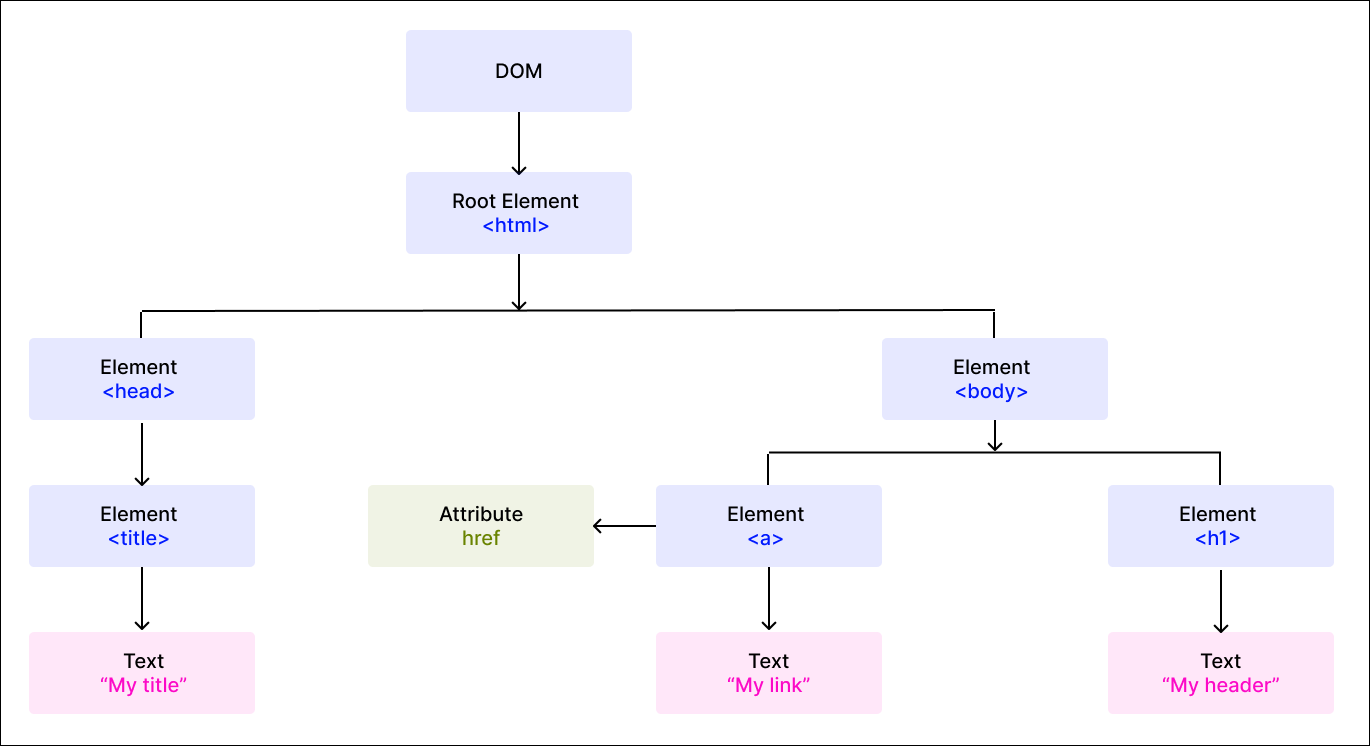
This tree-like structure is called the Document Object Model, also known as the DOM. It is a structural representation of the web document (an HTML document) as nodes and objects.
The DOM acts as an interface for the web document, allowing JavaScript and other scripting languages to access, alter, and interact with its content programmatically. Developers could use the DOM APIs to add or remove items, change their appearance, and perform user actions on web elements.
How re-rendering a page can impact performance
DOM actions are extremely fast and light. However, re-rendering might be costly when app data changes and causes an update.
Let's use the code below to simulate re-rendering a page:

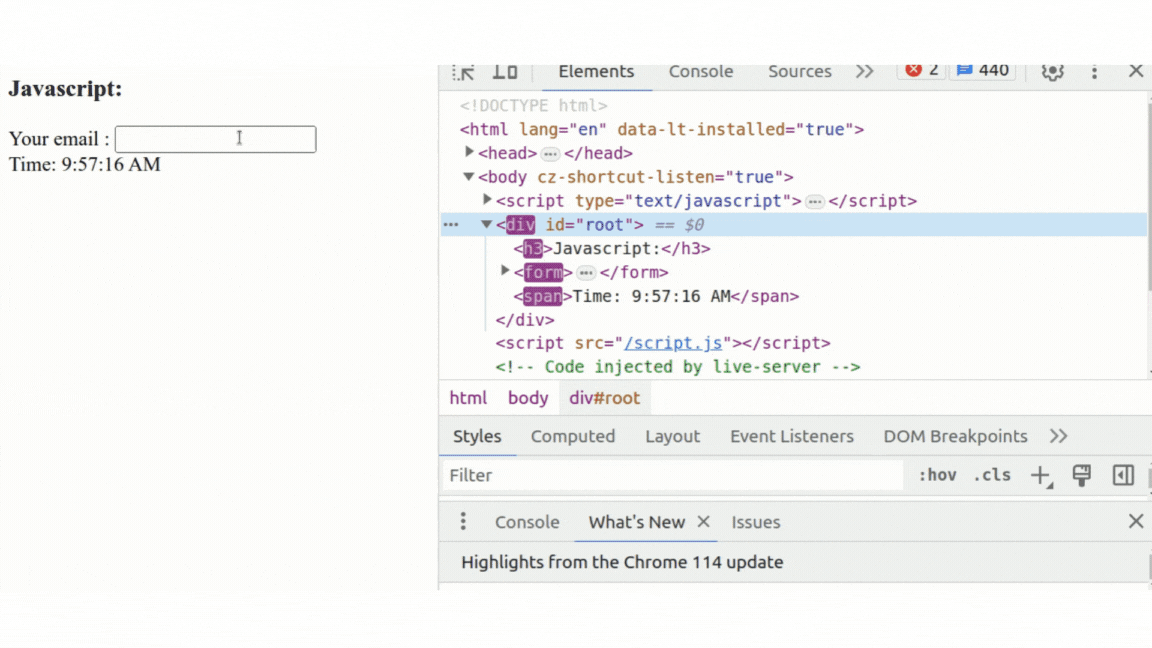
The setInterval() callback in the code allows us to simulate re-rendering the UI every second. On each update, the document DOM elements are rebuilt and repainted, as shown in the illustration above. Because of this re-rendering, the text input in the form also loses its state.
When it comes to building complex web applications with a lot of interactivity and state changes, this approach is slow and inefficient.
How does React implement the virtual DOM?
To understand the virtual DOM approach, we first need to understand the two main steps involved: rendering and reconciliation.
When we render an application's user interface, React generates a virtual DOM tree and keeps it in memory.
After an update in the virtual DOM (React), React will immediately create another tree with the updated part, compare it to a snapshot taken right before the update, detect what element was changed, and then update only that element on the real DOM.
The virtual DOM isolates the developer from manual DOM operations. You don't need to care about it when designing your application. It helps you write more predictable and smooth code while focusing on component design.
We can visually represent the virtual DOM as follows:
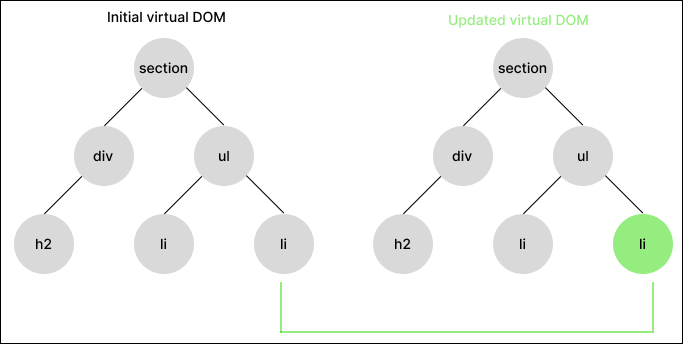
The first render is shown on the left. As a node changes, React generates a new tree containing the modified node, as seen on the right. React will compare the new virtual DOM tree to the old snapshot using a diffing process called reconciliation to determine what modifications are needed.
After the reconciliation process, React utilizes a renderer library such as React DOM, which uses all of the various data to change the rendered application. This module guarantees that the real DOM only receives and renders the changed node or nodes:
In short, React compares the virtual DOM tree to the previous version to decide which node is updated, ensuring that the modified node lines up with the actual DOM.
Get started with React
Now that you understand what a single-page application is, as well as the component-based architecture and the virtual DOM in React, let us develop our first React component 🤗.
However, we must first create a ReactJS development environment. In this part, I'll show you how to set up and configure a functioning React development environment step by step.
To execute a React application on our PC, we need a JavaScript runtime installed. So, the initial step will be to install a runtime; Node.js will be used in our situation.
What is NodeJs?
Node.js is an open-source and cross-platform JavaScript runtime environment.
This appears to be a cool, straightforward response. However, for a newbie, this definition may generate further questions. So let's break it down and figure out what it implies.
Node.js is open-source, which implies that the source code is available to the public. It is also supported by contributors from all across the world.
Node.js is cross-platform, which means it does not rely on any operating system software. It is compatible with Linux, macOS, and Windows.
Node.js is a runtime environment for JavaScript: When you type JavaScript code in a text editor, it cannot do anything until you execute (or run) it. A runtime environment also needs to be present to run your code.
How to install NodeJs
To see if node is already installed on your PC, open your terminal, typenode --version and press Enter. If it returns a number, you are good to go and may go to the following stage; if the command node is not recognized in your system, we must install it.
Node.js is installed differently on each operating system. The core setup file varies depending on the operating system. However, the Node.js designers have taken care to give you the files required for each system.
For macOS and Windows users :
Go to nodejs.org/en/download and be sure to install the LTS version.
In the LTS section, choose Other Downloads.
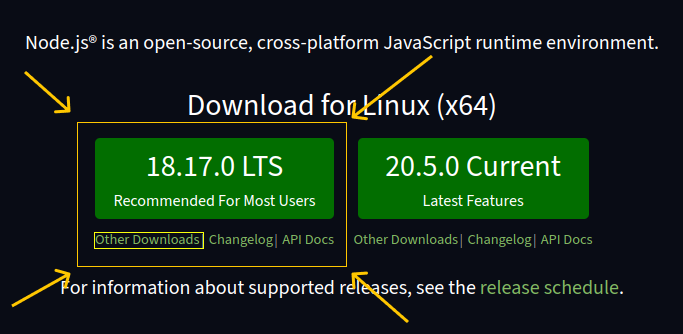
Choose the appropriate version for your operating system. If you have a 64-bit operating system, for example, download the 64-bit version; if you have a 32-bit operating system, get the 32-bit version.

After you double-click and launch the installer file, the installation will begin. The Node.js licensing agreement will be requested by the installation. To proceed, tick the "I accept" box and then click Next.
Follow the steps, and then click the install button before closing the installer.
For Linux users:
Choose the Node version for your distribution.
The Linux operating system has hundreds of different distributions because of the diversity it provides. Find the installation instructions for your specific distribution on Node.js’s Binary Distribution page.
For this guide, we’ll be using Ubuntu for illustration purposes.
Before installing Node.js, make sure you have the
curlcommand-line tool installed on your machine. If not, type the following command into your terminal to install curl.sudo apt install curlIt may ask for your system password to verify installation permissions. The system should begin the curl installation after you enter the password.
Start the NodeJs installation.
You need to copy and paste the Node.js installation command into your terminal (in our case, we can grab it from the Ubuntu distribution page) so that the system can begin the Node.js installation.
💡Each Node.js version has a distinctive installation command. Install the Node.js version that corresponds to your Linux configuration.For instance, here, we will be installing the version
18.x. These are the installation commands for Ubuntu:curl -fsSL https://deb.nodesource.com/setup_18.x | sudo -E bash -And then,
sudo apt-get install -y nodejsCopy and paste the instructions from the distribution page into your terminal to install NodeJs on your PC according to your setup.
We have completed the installation of node on our PC 🥳. Let us double-check that the installation was successful. Reopen the terminal and execute node --version again; the result should look like this: v18.xxx.
Now, we have NodeJs installed, we can easily execute a react application on our PC.
So, let us create our very first react application 🥳.
We will use:
Vite: a frontend tool for building web applications quickly, it aims to provide a faster and leaner development experience for modern web applications.npm: an online repository for the publishing of open-source Node.js projects; it is also a command-line utility for interacting with said repository that aids in package installation, version management, and dependency management. We will use it as a package manager.
For now, you don't need to be concerned with vite and npm; instead, consider them to be tools for your learning.
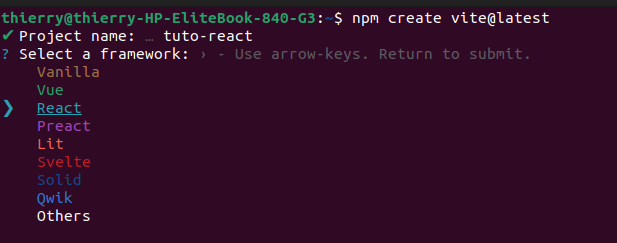
Open your terminal and create your React application with
vitenpm create vite@latestType the command above and press
enterYou will have to provide some details for your project like which package you want or need to be installed, the name of your project, which framework you want to use and so on.
Enter your project name

Select a framework; in our case, React
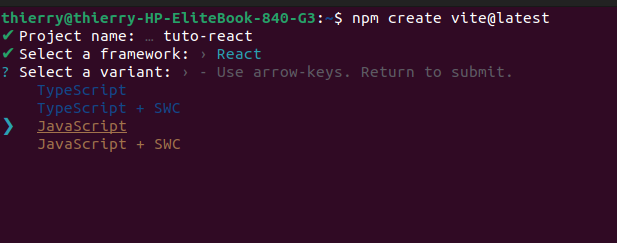
Select a variant, we will be using javascript:
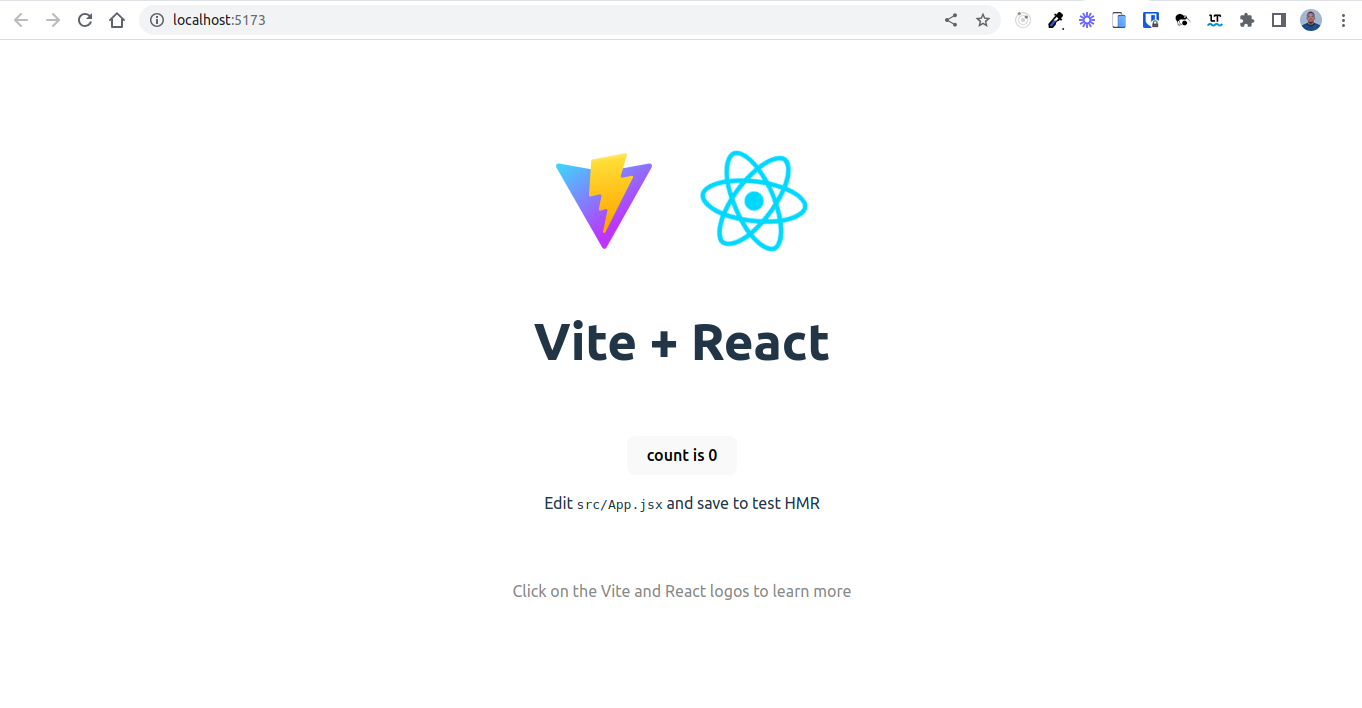
Now you are done, if everything was okay, you should have an output like this:

We are done with setting up things. Now, we are going to follow the instructions:
Change the working directory.
Install packages (module) we need to run the project.
Consider packages (modules) to be the same as JavaScript libraries. A set of functions you want to include in your application.
Start the project.

Type (npm run dev) to start up the application:

The project is ready at http://localhost:5173. Open your browser (chrome, firefox, ...) and copy/paste this URL to see our application.
🥳 We are ready to go!
So, let us open the project's folder and examine what's inside, the vite structure! You may use whatever code editor you wish, such as vscode or sublime. I'll be utilizing vscode in this series. If you don't have a code editor on your computer, I recommend vscode, which you can download and install here.
After accessing the project's folder with vscode, I get the following:
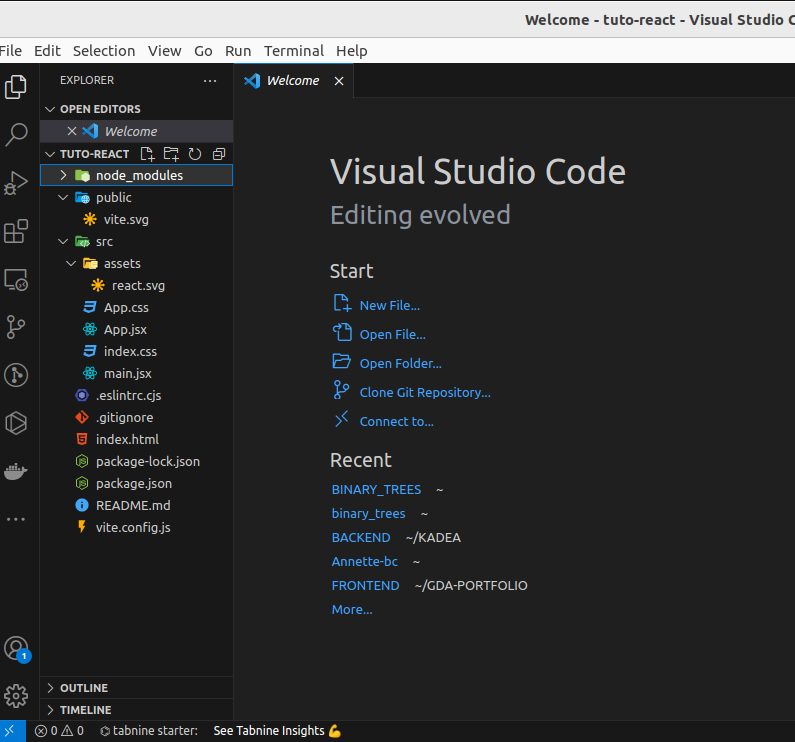
Don't be alarmed! Everything will be explained. When we used create vite@latest, vite built this folder structure automatically. We might have started from scratch, but remember that our initial aim is to learn and understand React; everything else will come later. So, we won't have to spend as much time configuring things. We rapidly built up a react environment thanks to npm and vite. We are now ready to have some fun with React 🥳.
node_modules: You can think of it as a cache for the external modules that your project depends on. When you npm install them, they are downloaded from the web and copied into the node_modules folder and Node.js is trained to look for them there when you import them anywhere in the project.
public: This directory contains static files that are served directly by our app, such as the favicon.
src: This folder contains the source code of our application.
assets: This folder contains static assets for our application such as images, videos, etc.app.jsx: This file contains the top-level component of our application. Remember, we said a React application is just a collection of small components that can be combined into more complex components.app.css: This file contains the style of the top-level component app.jsxmain.jsx: This is the main file (the entry point) of the application. It is in this file that we render our application (the top-level component) to the page (HTML file).index.css: This file contains the style of the entire application.
.eslintrc.cjs: In this file, we find the ESLINT configuration of the project. A comprehensive set of rules for JavaScript code that cover stylistic choices and prevent common bugs. We will learn more about it later.
.gitignore: This file tells us which file or folder to ignore when pushing our project's source code to the internet.
index.html: This file contains our one unique HTML page that we will be updating every time data to render changes.
package-lock.json: This file is automatically generated by npm when a package is installed. It records the exact version of every installed dependency (package), including its sub-dependencies (sub-packages) and their versions.
package.json: This file is the central place to configure and describe how to interact with and run our application. It is used by the npm to identify our project and understand how to handle the dependencies. It's the package.json file that enables npm to start your project, run scripts, install dependencies, and many other useful tasks.
README.md: This file gives other developers a detailed description of our project. It provides orientation for them to browse our code.
Last, comes the vite.config.js . It contains the vite's configuration for our project.
So, now that we've clarified the structure, we can move on to creating our very first component 🥳! Let's do it!
But first, remove the.eslintrc.cjs file and everything else in the src folder except the main.jsx file (the entry point). We'll start with a clean main.jsx and develop our application step by step, making sure we understand everything.
Create your first React component

Inside the main.jsx, create your very first react component. Remember, it is just a javascript function that returns HTML code! Nothing to worry about 😎.
Don't be in a hurry 😂! There is one more thing you need to know before creating your component :
In React, the type of a component (element) is determined by the way you name it. A React component can be one of the following types:
A DOM element (an HTML element);
A React component (i.e. class or function);
React has a built-in convention for component naming:
Capitalized: component names with the first letter uppercase are treated as a React component (e.g.
<Helloworld />);Dot Notation: component names with a dot in the name, regardless of the case, are also treated as React components (e.g.
<hello.world />,<Hello.Word />, etc.);Lowercase: component names starting with lowercase letters are treated as HTML elements (e.g.
<div>,<span>, etc.).
React would interpret a component differently based on the way we name it. So, if we want to create a React component, it must either start with a capital letter or use the dot notation otherwise it will be interpreted like an HTML element.
eg:
function HelloWorld () {
    return <h2>Hello World</h2>
}
After creating the component, we are going to render it to the page, in other words, insert it in the HTML document.
By default vite creates a <div id='root'></div> element for us in index.html, this will be our root HTML element because the whole application (top-level component) will be inside it.
We'll utilize ReactDOM, a React library that lets us interact with and alter the DOM structure.
In React, we utilize the createRoot function from ReactDOM to create the root node for our application, which accepts as an argument the html element (root element) in which we want our application to be rendered. After we have the root node, we can use the ReactDOM render function to render the component (our application).
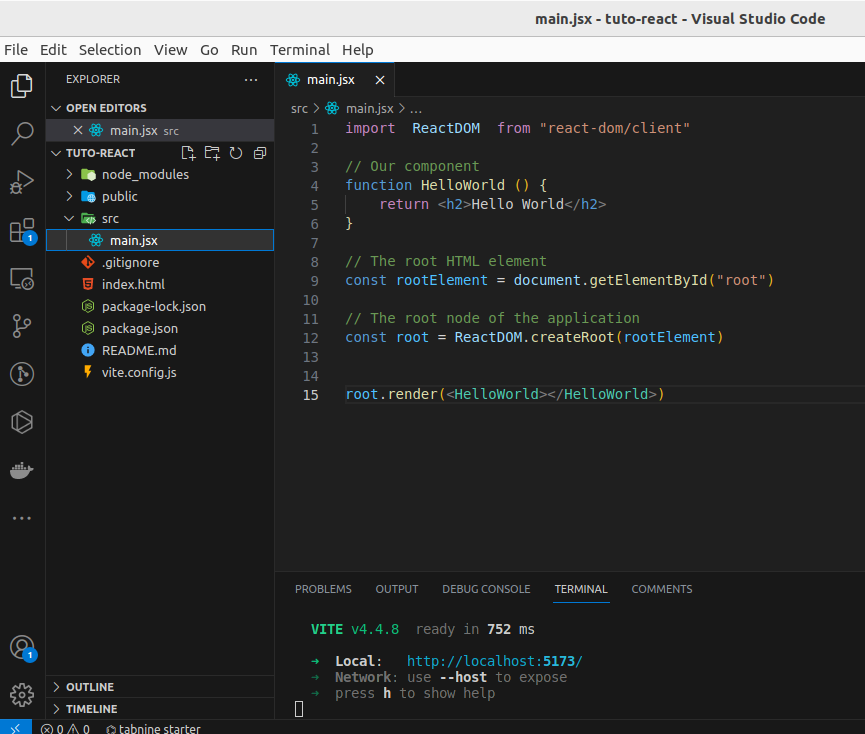
Don't worry about the import statement; we'll go over it in more detail in the following article.
Open your terminal and restart the server if it isn't ready to visualize our application. You can also use the integrated terminalvscode; you can open it as follows:
From the menu, use the Terminal > New Terminal or View > Terminal menu commands.
From the Command Palette (
Ctrl+Shift+P), use the View: Toggle Terminal command.In Explorer, you can use the Open in Integrated Terminal context menu command to open a new terminal from a folder.
To toggle the terminal panel, use the
Ctrl+`keyboard shortcut.To create a new terminal, use the
Ctrl+Shift+`keyboard shortcut.
If the application hasn't already started, use the command npm run dev, then open a browser, input the application's local address (http://localhost:[PORT]), and press enter.
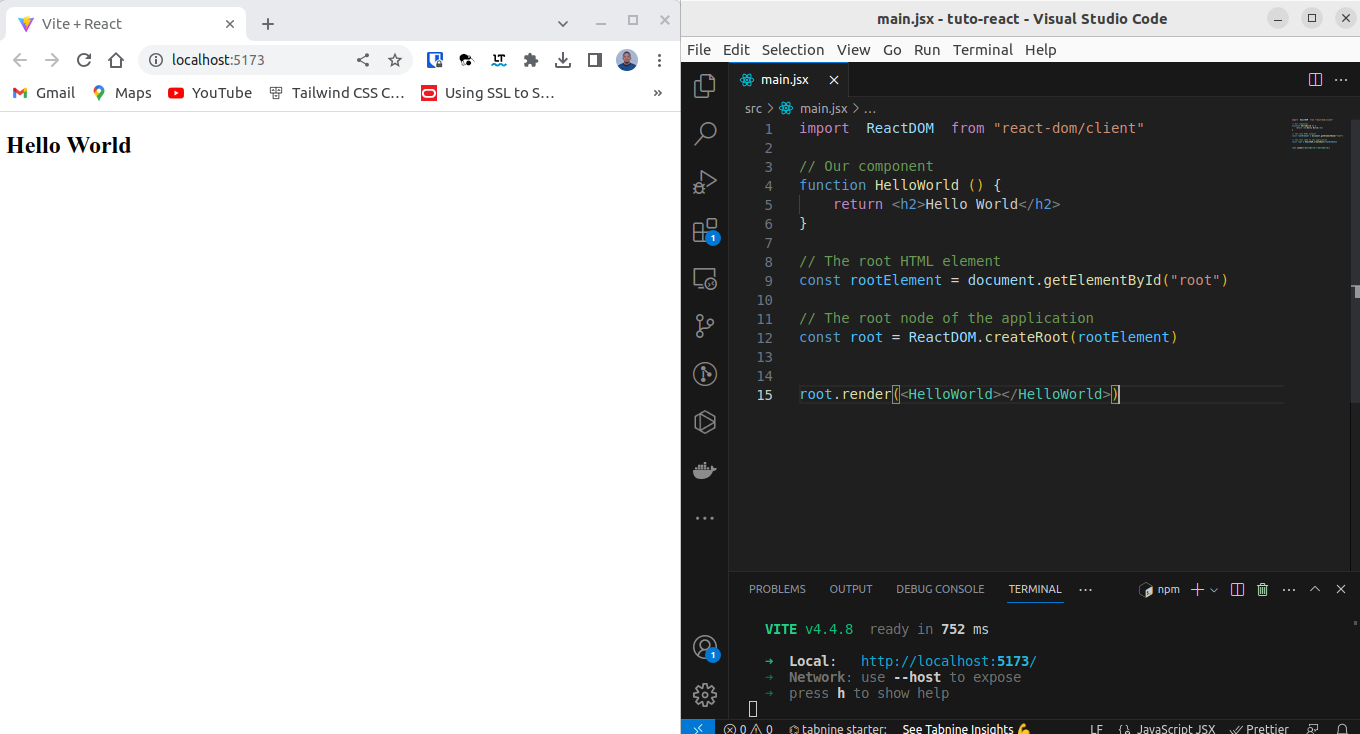
🥳🥳🥳 Many congratulations!!! You did it! 💯!
You may experiment with changing the HTML returned by the component and see the changes immediately. You will find the source code here, and I'm going to publish the source code there for the following several posts.
This article has provided a comprehensive overview of ReactJs and teaches you the basics of React by exploring the concepts of component-based architecture and virtual DOM. I hope you enjoyed it.
In the next part, we will learn more about React components, JSX and ECS6.
Have you liked this reading? Connect with me on Twitter, LinkedIn, and GitHub for more articles like this.
Thank you for reading and sharing this with your network.
See you in the next part 💯.


