

Build Modern Web Applications using ReactJS #2.
Exploring React Components, JSX, and ECS6: A Comprehensive Guide

I am a FullStack Software Developper . As part of the learning process , i decide to start sharing with you what i learn on this plateform .
🥳 Hello and welcome! 👋
This is part of a series of articles. If you are new and would like to begin with the first post, click here. In the previous post, we introduced this series and talked about component-based architecture and the virtual DOM.
In this post, we will be exploring the React component, JSX in-depth, and some of the new ES6 features that many JavaScript frameworks and libraries use. Additionally, we will explore the concepts of rendering and transpiling.
At the end of this chapter, we will be able to build a static website with React. We will integrate the Touché website:

This will be accomplished with the aid of all we will study in this chapter. So, let us start with the ECS6 features.
ECS6 ReactJS Features You Should Know
ES6 (ES2015) and subsequent editions of the ECMAScript standards have introduced a slew of new features that were not previously available in JavaScript. Even if you have previous JS knowledge, you will encounter several challenges if you do not have a solid knowledge of ES6 features, especially when working with React. In this section, we'll go through the most essential new ES6 features that are frequently used in React:
Template Literals
Arrow functions
Spread Operator
Destructuring
Modules
How to use Template Literals
Template literals allow you to specify a string using backticks (``) rather than quotes (""):
const name = `John`
This offers several advantages:
Easy string concatenation
 const amount = 20;

 // Before:
 const message = "The total amount is " + amount + " $";
 // Now:
 const message = `The total amount is ${amount} $`;
Single and double quotes do not need to be escaped
 // Before:
 console.log("\"Hello World\"")
 // Now:
 console.log(`"Hello World"`)
You can write multiline strings without using the new line character
 console.log("Hello guys\nHow are you?")
 console.log(`Hello guys
 How are you?`)
How to use arrow functions
The use of arrow functions helps us to write our functions more concisely. They are not just a “shorthand” for writing small stuff. They have some very specific and useful features in Javascript.
// BEFORE:
var greetings = function() {
  return "Hello World"
}

//or

function greetings() {
  return "Hello World"
}

// NOW:
const grettings = () => {
    return "Hello World"
}

// or

const grettings = () => "Hello World"
The function keyword was removed while the fat arrow operator => was introduced.
They are used for anonymous functions, i.e. function expressions. In other languages, they are known as lambda functions:
const results = [2, 65, 3, 45, 15, 23];

const newResult = results.map((result) => {
  return result + 2;
});

// or
const newResult = results.map((result) => result + 2);
How to use the spread operator
The spread operator ... is a new addition to the JavaScript ES6 operator set. It is used to expand or spread an iterable object. In simple terms, an iterable is anything that can be looped over (e.g.: array, string, set, ...). With this operator, we can:
Construct an array literal:
When you build an array in literal form, you can use the spread operator to insert another array into the initialized array. Consider the following:
 let myArray = ["A", "B", "C", "D"];
 let initialArray = [...myArray, "E", "F", "G", "H"];

 console.log(newArray); // ["A", "B", "C", "D", "E", "F", "G", "H"]
Concatenating arrays:
You can also use the spread operator to join two or more arrays:
 const oddNUmbers = [1, 3, 5, 7, 9];
 const evenNumbers = [2, 4, 6, 8, 10];
 const allNumbers = [...oddNUmbers, ...evenNumbers];

 console.log(allNumbers); // [1, 3, 5, 7, 9, 2, 4, 6, 8, 10]
Copy an array:
You may also use the spread operator to clone an array instance:
 const numbers = [80, 70, 90];
 const copiedNumbers = [...numbers];

 console.log(copiedNumbers); // [80, 70, 90]
Spread operator and strings:
 const chars = ["A", "B", "C", ..."DEF", "G", "H"];
 console.log(chars); // ['A', 'B', 'C', 'D', 'E', 'F', 'G', 'H']
In the example above, we created the
charsarray from individual strings. When we use the spread operator to the 'DEF' string, it spreads out each character of the string 'DEF' into distinct characters.Pass array elements as arguments:
Instead of passing each element as a separate argument, the spread operator allows array items to be sent in as individual arguments.
 const add = (number1, number2, number3) => {
   return number1 + number2 + number3;
 };

 const numbers = [2, 4, 6];

 // Instead of:
 console.log(add(numbers[0], numbers[1], numbers[2]));

 // You can:
 console.log(add(...numbers));
Spread operator with objects:
Spreading all enumerable, own properties of an object is also possible using the spread operator. Supposed that you have a
rectangleobject with two propertiesheightandwidth:const rectangle = { height: 100, width: 250, };The following example used the spread operator (...) to create a
coloredRectangleobject with all of the characteristics of arectangleobject as well as its additional propertycolor:const coloredRectangle = { ...rectangle, color: "blue", }; console.log(coloredRectangle) // {height: 100, width: 250, color: 'blue'}Spread operator with object use cases:
Clone an object:
const rectangle = { height: 100, width: 250, }; const clonedRectangle = { ...rectangle, }; console.log(clonedRectangle); // {height: 100, width: 250}Note that the spread
...operator for both arrays and object (set) creates a shallow copy for the nested elements/properties and a deep copy for the top-level elements/properties when cloning.For example:
  const rectangle = {
    height: 100,
    width: 250,
    style: {
      color: "blue",
    },
  };

  const newRectangle = {
    ...rectangle,
  };

  console.log("===== Before modification =====");
  console.log("Old rectangle");
  console.log(rectangle.height, rectangle.style.color);
  console.log("New rectangle");
  console.log(newRectangle.height, newRectangle.style.color);

  // Top-level property
  newRectangle.height = 500;
  // Nested property
  newRectangle.style.color = "green";

  console.log("===== After modification =====");
  console.log("Old rectangle");
  console.log(rectangle.height, rectangle.style.color);
  console.log("New rectangle");
  console.log(newRectangle.height, newRectangle.style.color);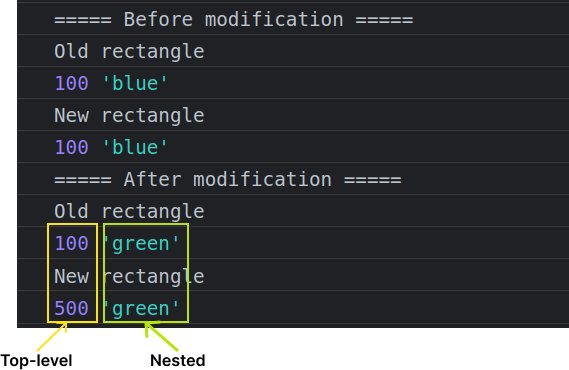
We notice that the change made for the nested property for the new object affects the old object.
There are two ways to copy objects in JavaScript: shallow copy and deep copy. Deep copying creates a new object with new memory locations for all of its attributes/elements, whereas shallow copying makes a new object with references to the same memory regions as the original object.
Merge objects:
You can combine two objects with the spread operator, just like you concatenate with arrays.
  const rectangle = {
    height: 100,
    width: 250,
  };

  const style = {
    color: "blue",
  };

  const newRectangle = {
    ...rectangle,
    ...style,
  };

  console.log(newRectangle);
  // {height: 100, width: 250, color: 'blue'}
Clash properties :
When duplicate properties clash, the order influences the outcome. The property that was put in last wins.
If we spread the object last:
  const obj1 = {
    name: "John",
    age: 30,
  };

  const obj2 = { age: 10, color: "white", ...obj1 };

  console.log(obj2);
  // {age: 30, color: 'white', name: 'John'}
If we spread the object first:
  const obj1 = {
    name: "John",
    age: 30,
  };

  const obj2 = { ...obj1, age: 10, color: "white" };

  console.log(obj2);
  // {name: 'John', age: 10, color: 'white'}
Clashing properties allow us to set default values easily. Assume we're developing an app that requires a user to enter information. If users leave any fields blank, we want some default values to be set on the user object:
        const defaultValue = {
          name: "N/A",
          role: "customer",
          email: null,
        };

        const enteredInfo = {
          name: "John",
          email: "email@example",
        };

        const userInfo = { ...defaultValue, ...enteredInfo };
Here the default values come in first, the entered info will overwrite the value that clashes, otherwise, the default values will be considered.
How to use destructuring assignment
The destructuring assignment syntax is a JavaScript expression that allows you to extract elements/attributes into individual variables. It works with any iterable object on the right side.
Assume that we have an object that contains the user's information and we want to extract its phone number and email address:
const userInfo = {
    name : 'John',
    phoneNumber : '123-456-1234',
    email: 'john@example.com',
    age : 21,
}

// Instead of:
const phoneNumber = userInfo.phoneNumber
const email = userInfo.email

// Do:
const {phoneNumber , email} = userInfo

console.log(phoneNumber, email)
// 123-456-1234 john@example.com
With array:
const adresses = ["598 Virginia Street, Apartment 2", "River Grove IL 60171"];
// Instead of:
const line1 = adresses[0]
const line2 = adresses[1]

// Do:
const [line1, line2] = adresses;

console.log(line1, line2);
// 598 Virginia Street, Apartment 2 River Grove IL 60171
Object destructuring
With aliases:
  const userInfo = {
    name: "John",
    phoneNumber: "123-456-1234",
    email: "john@example.com",
    age: 21,
  };

  const { phoneNumber: phone, name: userName } = userInfo;

  console.log(phone, userName);
  // 123-456-1234 John
Here, The colon indicates "what: goes where". In the example above, the property
phoneNumberis assigned tophone, the propertynameis assigned touserName.With default values:
For potentially missing properties we can set default values using
=:const userInfo = { name: "John", email: "john@example.com", age: 21, }; const { phoneNumber = 'null', name = 'N/A'} = userInfo; // Default values & alias const { phoneNumber: phone = 'null', name: userName = 'N/A'} = userInfo; console.log(phoneNumber,name) // null John console.log(phone, userName); // null JohnAny expressions or even function calls can be used as default values:
  const userInfo = {
    name: "John",
    email: "john@example.com",
    age: 21,
  };

  const {
    phoneNumber = (() => {
      return "Ouups anonymous user!";
    })(),
    name = "N/A",
  } = userInfo;

  console.log(phoneNumber, name);
  // Ouups anonymous user! John
Here, the default value for the
phoneNumberis a self-calling arrow function which returns"Ouups anonymous user!".With existing variables:
Variables were declared directly in the assignment in the preceding examples:
const/let {...} = {...}. Of course, we could also use existing variables. However, there is a catch:const userInfo = { name: "John", email: "john@example.com", age: 21, }; let name, email; {age, email} = userInfo // doesn't workThe issue is that JavaScript considers
{...}in the main code flow to be a code block. So, because JavaScript believes we have a code block, there is an error when destructuring. We will use parenthesis(...)to indicate JavaScript that this is not a code block:const userInfo = { name: "John", email: "john@example.com", age: 21, }; let age, email; ({age, email} = userInfo) console.log(age, email) // 21 'john@example.com'With nested object:
If an object/array contains nested objects/arrays, we can extract deeper sections using more complicated left-side patterns:
  const userInfo = {
    name: "John",
    phoneNumber: "123-456-1234",
    email: "john@example.com",
    age: 21,
    adresses: {
      line1: "598 Virginia Street, Apartment 2",
      line2: "River Grove IL 60171",
    },
  };

  const {
    email,
    adresses: { line1, line2 },
  } = userInfo;

  console.log(line1, line2);
  // 598 Virginia Street, Apartment 2 River Grove IL 60171
Unpacking the properties from objects as a function parameter:
Objects given as function arguments can also be unpacked into variables and accessed within the function body. In terms of object assignment, the destructuring syntax allows the new variable to have the same or a different name than the original property, as well as to assign default values when the original object does not define the property:
  const user1 = {
    name: "John",
    phoneNumber: "123-456-1234",
    email: "john@example.com",
    age: 21,
    adresses: {
      line1: "598 Virginia Street, Apartment 2",
      line2: "River Grove IL 60171",
    },
  };

  const displayUser = ({
    name : userName = "N/A",
    email,
    age,
    adresses: { line2 },
    role = "customer",
  }) => {
    const repr = `Name: ${userName}
          Email: ${email}
          Role: ${role}
          Age: ${age}
          Adresses - Line2: ${line2}`;

      return repr
  };

  console.log(displayUser(user1));
  // Name: John
  // Role: customer
  // Age: 21
  // Adresses - Line2: River Grove IL 60171
  // Email: john@example.com
Setting a function parameter's default value:
We saw that default values may be given with
=and that they would be utilized as variable values if the requested property does not exist in the supplied object:const drawCircle = ({ radius = 1, cords = { x : 0, y : 0 }, size = "medium", } = {}) => { console.log(radius,cords, size); // Draw }; drawCircle() // 1 {x: 0, y: 0} 'medium'In the example above, we have the
drawCirclefunction that takes a circle object as a parameter. The function has default values forxandycords set to 0 and forsizeset tomedium.With a dynamic property:
You can extract properties with a dynamic name into variables (the property name is known at runtime):
  const hero = {
    name: "Batman",
    realName: "Bruce Wayne",
  };

  const prop = "name";
  const { [prop]: name } = hero;

  console.log(name);
  // Batman
Array destructuring
Swap variables:
In a single destructuring expression, the values of two variables can be exchanged. Swapping two values without destructuring assignment necessitates the use of a temporary variable.
  let a = 4;
  let b = 5;

  // ==== Without destructuring ====
  let temp;

  temp = a;
  a = b;
  b = temp;

  console.log(a, b);
  // 5 4

  // ==== With destructuring ===

  [a, b] = [b, a];

  console.log(a, b);
  // 5 4
Parsing an array returned from a function:
It has always been possible for a function to return an array. Working with an array return value may be made quicker by destructuring.
  const adress = () => {
    return ["598 Virginia Street, Apartment 2", "River Grove IL 60171"];
  };

  const [line1, line2] = adress();

  console.log(line1, line2);
  // 598 Virginia Street, Apartment 2 River Grove IL 60171
In the example above,
adress()provides the addresses in an array as its output, which may be destructured into a single line.With default values:
const [firstName = "N/A", lastName = "N/A"] = ["John", "Doe"];The rest:
If the array is longer than the list on the left, the "extra" entries are usually ignored.
For example, only two things are taken in this case, and the remainder is simply ignored:
  const fruits = ["apple", "orange", "banana", "grapefruit", "kiwi", "mango"];

  const [first, second] = fruits;

  console.log(first, second);
  // apple orange
If we also want to collect everything that comes after, we can add one more argument that gets "the rest" by using three dots
...:const fruits = ["apple", "orange", "banana", "grapefruit", "kiwi", "mango"]; const [first, second, ...others] = fruits; console.log(first, second); // apple orange console.log(others); // ['banana', 'grapefruit', 'kiwi', 'mango']It works with both arrays and objects
How to use ECS6 Modules
One of the most difficult aspects of developing a web app is determining how quickly you can expand and adapt to market demands. When the demand (requirements) rises, so do the capabilities (features). As a result, it is critical to have a robust architectural foundation in place so that the app may expand naturally. We don't want to get to the point where the app can't scale because everything in it is mixed.
Modules have been in JavaScript for quite some time. However, they were implemented through libraries rather than being incorporated into the language itself. JavaScript now offers built-in modules for the first time in ES6.
What is the purpose of ECS6 modules?
Consider the following scenarios to see why modules are important:
Don't try to reinvent the wheel:
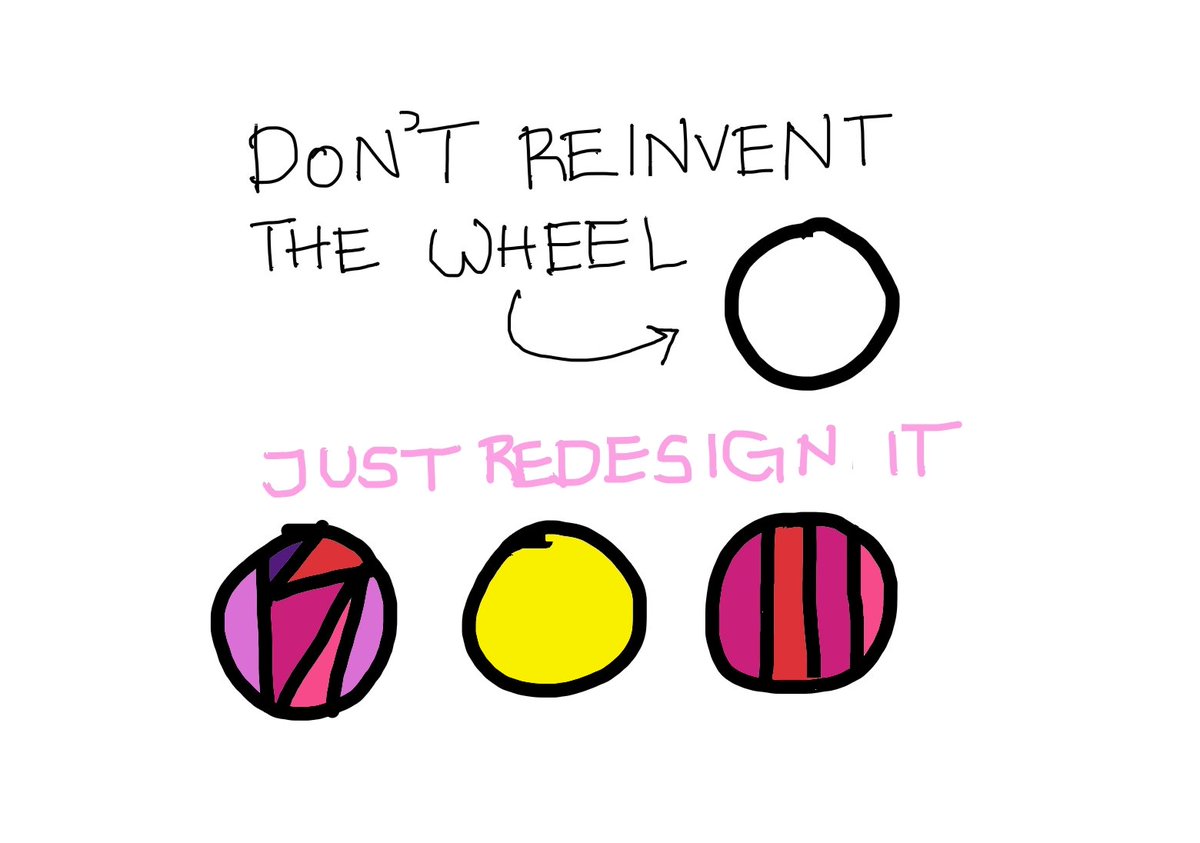
As developers, we frequently reproduce things that have previously been created without even realizing it, or we copy and paste things to save time. Finally, it all adds up, and we have x number of identical copies dispersed across the program. For each modification, we must repeat the process x times, depending on how many copies we have.
For example, consider a car factory trying to redesign the engine with each new model, or an architect beginning from fresh with each sketch. It is not difficult to do so, but what is the sense of knowing if you cannot apply what you have learned?
Debugging:

If the system is very complex and there is a lack of documentation, it is tricky for old/new developers to figure out how the program works and how things are related to one another.
For example, A developer should be able to find out the consequence of a change without guessing; otherwise, we end up with plenty of errors and no idea where to start the debugging process. By encapsulating behaviour in modules, we can simply narrow down the debug process and rapidly identify the cause of the problem.
In brief, we require ES6 modules to properly reuse, maintain, isolate, and encapsulate internal behaviour from external behaviour. It is not about making the system complex, but about being able to simply grow and eliminate things without breaking the system.
In this section, I'll show you how modules work in JavaScript before implementing them in React. I will be talking about import and export keywords.
By default, everything stated inside a module is local to the module. If you want anything declared in a module to be public so that other modules may use it, you must export that feature. There are a few options. The most straightforward method is to add the export keyword.
// main.js
export const hero = {
  name: "Batman",
  realName: "Bruce Wayne",
};

export const displayName = (name) => {
    console.log(name)
}

export default const name = 'John'
Now, in a separate file, we can import and use the hero object
// demo.js
import { hero } from "./main.js";

console.log(hero.name);
// Batman
To import several names from a module, use the following syntax:
import {hero, displayName} from "./main.js"
Any top-level function, class, var, let, or const can be exported.
And that's all you need to know to write a module!
Because the code is a module and not a script, all declarations will be scoped to that module and not globally viewable across all modules. Just export the declarations that make up the module's public API, and you're done.
Apart from exports, the code in a module is pretty much like standard code.
When you run a module with an import declaration, the modules it imports are loaded first, and then each module body is processed in a depth-first traverse of the dependency network, bypassing anything that has previously been executed to prevent cycles.
And those are the fundamentals of modules. It's fairly easy 😋.
Importing and exporting in detail
Named exporting styles
There are two ways to export named items within modules:
Use the keyword export for making declarations:
  export const name = "John";

  export function displayName() {}

  export const hi = (name) => {};

  export class JOI {}
List anything you wish to export at the end of the module:
  function displayName() {}
  const name = "John";
  const hi = (name) => {};
  class JOI {}

  export { displayName, hi, JOI, name };
You may also export items with aliases:
  const name = "John";

  export { name as userName };
Default exports (one per module)
Modules that only export single values are quite common in the Node.js community. However, they are also frequent in front-end programming, where you frequently have only one class or component per module. An ES6 module can provide a default export, which is the principal exported value:
 // main.js
 export const name = 'John'
 export default function () {
     return name
 }
function displayName () { return name } export {displayName as default}For importing:
 // demo.js
 import myFunc from "./main.js"
 //with alias
 import {default as displayName} from "main.js"

 console.log(myFUnc())
 // John
As it is a default export, we can use any name you want when importing
There are two styles of default exports:
Labeling declarations
You can make any function declaration or class declaration the default export by prefixing it with the terms
export default:export default function foo() {} export default class Bar {}In this scenario, you may also omit the name.
Default exports are the only place in JavaScript where anonymous function and class declarations exist:
 export default function () {}
 export default class {}
Default-exporting values directly
 export default 2 + 3
 export default 'John'
 export default {name : 'John', age : 21}
 export default /^[1-5]{3}$/
Re-Exporting styles
Re-exporting means integrating another module's exports into those of the current module.
Include all the exports from the other modules:
  export const name = "John";

  export * from "./main";
Here, default exports from
main.jsare ignored!Named re-exporting:
export {name as userName, myFunc} from "./main"Making a re-export the default export:
  // demo.js
  export {default} from "./main"
The above statement makes the default export of
mainthe default exportdemo.
Import the module as an object
 import * as main from "main"

 console.log(main.displayName())
Empty import: only loads the module
import "index.js"Combining a default import with a namespace import
import theDefault, * as main from "main"Combining a default import with named imports
import theDefault, {name as userName} from "main"Imports and exports must be at the top level
The structure of ES6 modules is static; you cannot conditionally import or export anything. This restriction is enforced syntactically by only allowing imports and exports at the module's top level:
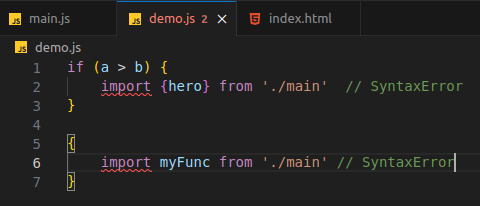
Imports are hoisted
Imports of modules are hoisted (moved to the beginning of the current scope). The following code works perfectly:
 myFunc();

 import { myFunc } from "./main";
It was worth taking time to grasp these features before embracing React. Now we are good to continue with React concepts and have fun with them 🥳.
But, before you continue, I recommend that you take a 1-minute pause and return with fresh energy to embrace the rest of the article.

JSX in Depth
JSX is part of React's core concepts; if you understand it well, you will be more comfortable writing React code. In this section, we will explore:
What is JSX in React, and how can you utilize it?
How does JSX get converted to
React.createElementWhat exactly is a JSX expression, and what can we put inside it?
Different ways to add CSS to JSX
In this section, we will also see some common JSX problems and how to fix them.
What is JSX?
In the previous post, I showed that a React component is just a JavaScript function that returns HTML code, which means that, in the same file, we wrote both JavaScript code and HTML code.
The acronym JSX stands for JavaScript XML. JSX allows us to put HTML in JavaScript code. It is nothing more than a React syntax extension that allows us to write HTML directly in React.
Consider the following example:
const jsx = <h2>Hello World</h2>
This is a sample JSX code. If you try to run it, the browser won't understand it because it is not valid JavaScript code (we are assigning an HTML element to a JavaScript variable).
To transform it into browser-friendly JavaScript code, we need a compiler/transpiler. This is where Babel comes in. Babel works as a transpiler, allowing us to convert the above code into React function calls, which are then JavaScript functions (React is a Javascript library). When Babel executes the above code, it transforms it like this:
const jsx = /*#__PURE__*/React.createElement("h2", null, "Hello World")
When we use create-react-app or vite to create a React project, we get a default Babel setup that we may alter if necessary.
What is the React.createElement function?
Every time you put an HTML element in your component, it will be transformed into a React.createElement function call so that the browser can understand it.
Here is the syntax:
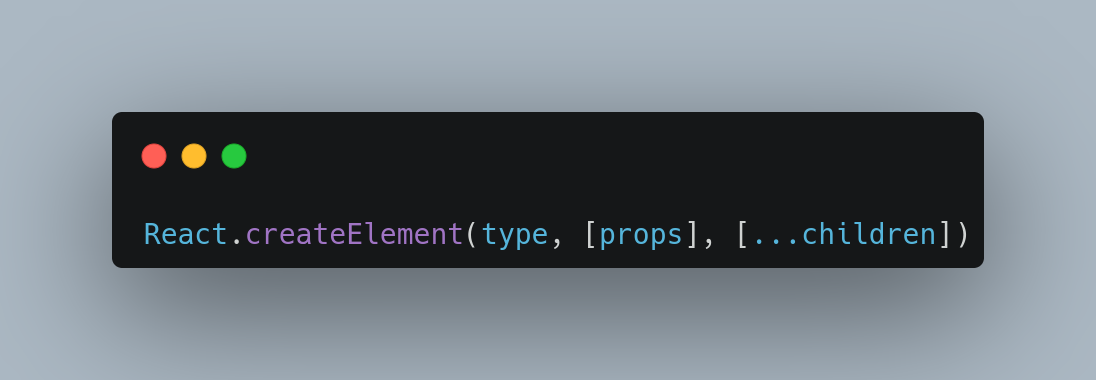
type: can be any HTML tag
props: the attributes you want to pass to the element
children: can be another HTML element (another
React.createElement)or a text
An example with nested components:
JSX code:
import React from "react"; function Profile() { return ( <div class="profile"> <h2>UserName: John</h2> <div class="role"> <p>Role:</p> <span>SoftWare Ingeneer</span> </div> </div> ); }💡A multiple-line JSX expression must be enclosed in parentheses.JavaScript's code:
  function Profile() {
    return /*#__PURE*/ React.createElement(
      "div",
      {
        class: "profile",
      },
      [
        /*#__PURE*/ React.createElement("h2", null, "UserName: John"),
        /*#__PURE*/ React.createElement(
          "div",
          {
            class: "role",
          },
          [
            /*#__PURE*/ React.createElement("p", null, "Role:"),
            /*#__PURE*/ React.createElement("span", null, "SoftWare Ingeneer"),
          ]
        ),
      ]
    );
  }
However, this is not perfect because React needs to be in scope so that JSX can convert each element to a React.createElement call, otherwise, Babel won't be able to transform the JSX code, there are also some performance improvements and simplifications that React.createElement does not allow.
To solve these issues, React 17 introduces two new entry points to the React package that are intended to only be used by compilers like Babel. Instead of converting JSX to React.createElement calls, the new JSX transform automatically imports and uses specific methods from those new entry points in the React package.
Let us assume your code looks like this:
function HelloWorld(){
    return <h2>Hello World</h2>
}
This is what the new JSX transform compiles it to:
// Introduced by a compiler (don't import it yourself!)
import {jsx as _jsx} from 'react/jsx-runtime';

function HelloWorld() {
    return _jsx('h2', { children: 'Hello world' });
}
Here, we don't need to import React to use JSX anymore!
react/jsx-runtime must only be used by the compiler transform.Now that we understand what JSX is, what its purposes are, and how to utilize it, let us see how to return complex JSX properly.
Return multiple elements in React
In the previous examples, we saw how to return JSX but with a single element (div, h2, section, ...). What if we want to return two or more elements at once? Consider the following example:
function App (){
  return (
          <h2>What is JSX ?</h2>
          <h2>How does it work ?</h2>
         )
}
If you try to execute the code above, you will get this error:
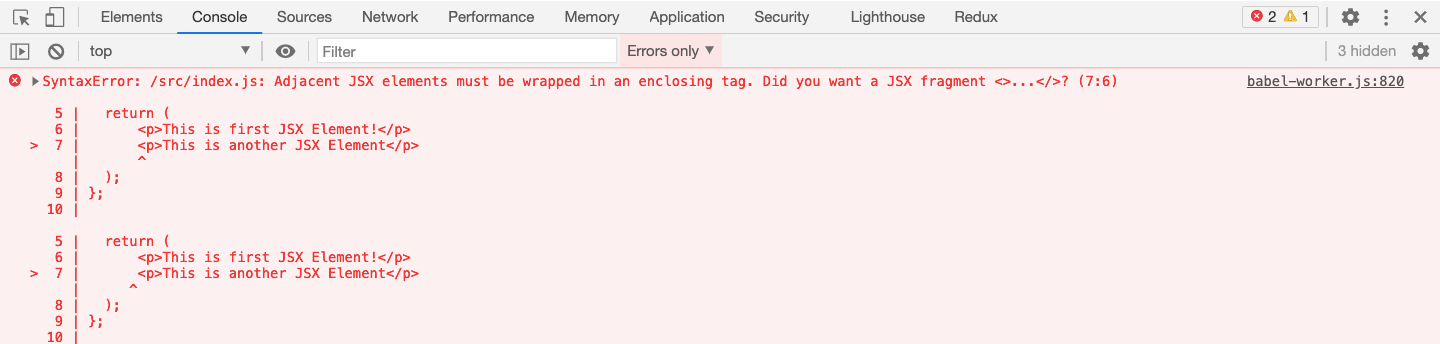
Here, we are returning multiple elements in react, It's similar to building multiple trees in the DOM or having multiple root nodes.
React relies on a tree-like structure, where nodes in the tree always have a root node (a parent element).
The issue is that if your component returns more than one element, React will produce an error since it doesn't know what the "root node" (parent element) is.
The obvious approach is to enclose both of them in some parent element, most likely a div or a section, as shown below:
function App() {
  return (
    <div>
      <h2>What is JSX ?</h2>
      <h2>How does it work ?</h2>
    </div>
  );
}
Sometimes, you may be required to return each piece separately. We have additional options in React:
Return it as an array:
 function App() {
   return [<h2>What is JSX ?</h2>, <h2>How does it work ?</h2>];
 }
This will complete the task, but as you can see in the browser console, you will receive a warning: "Each child in a list should have a unique key prop"
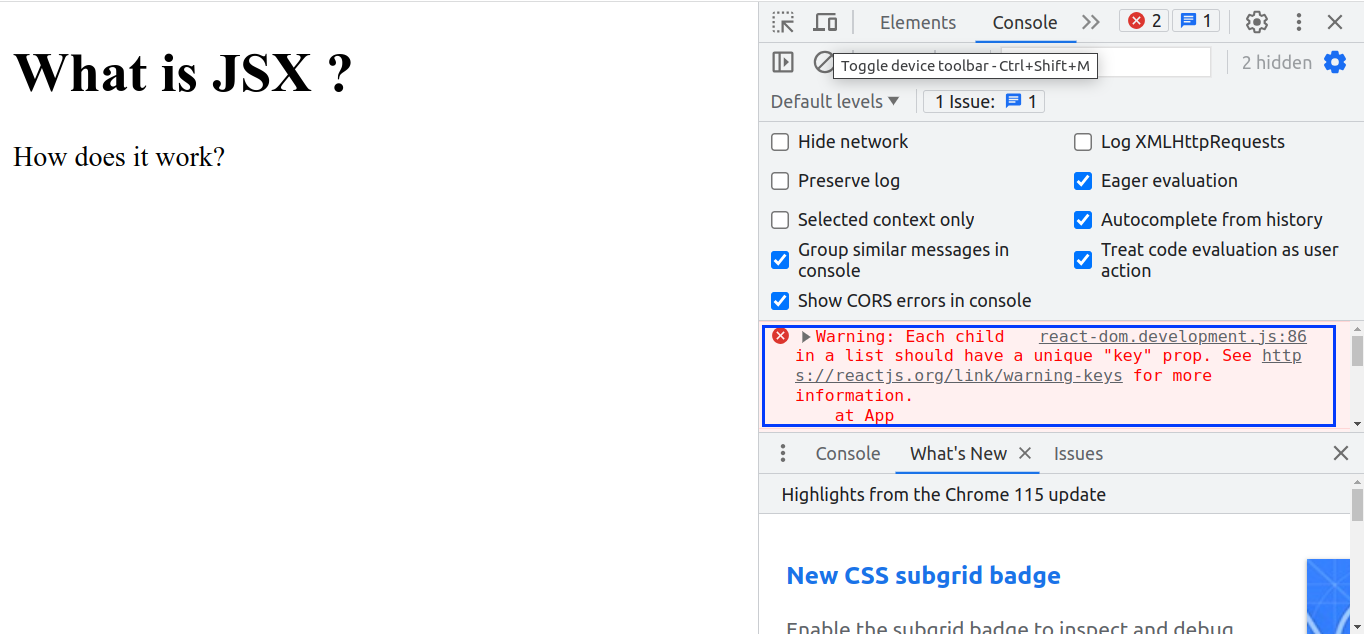
We can fix this by adding a unique key for each element in the array:
 function App() {
   return [<h2 key="1">What is JSX ?</h2>, <h2 key="2">How does it work?</h2>];
 }
Another option is to use the
<React.Fragment></React.Fragment>element:This element allows us to group a list of elements without adding a node to the DOM. We can use
<></>as shorthand.function App() { return ( <React.Fragment> <h2>What is JSX ?</h2> <h2>How does it work ?</h2> </React.Fragment> ); } // OR function App() { return ( <> <h2>What is JSX ?</h2> <h2>How does it work ?</h2> </> ); }
How to insert JavaScript code in JSX
So far, we've just utilized HTML tags as part of JSX. However, JSX becomes interesting when we include JavaScript code within it. To open a window to JavaScript in JSX, we use curly braces, like in the following example:
function App() {
  const gretting = "Hello world";

  return <p>{gretting}</p>;
}
Because each element in the array will be treated as an expression or an element, we may also write an array inside curly brackets.
function App() {
  const myArray = [
    "Hello world",
    12,
    (function Hi() {
      return "Hi guys";
    })(),
    <span>Thierry</span>,
  ];

  return <div>{myArray}</div>;
}
The expression above will be treated like this: {{"Hello world"}{12}{(function Hi(){return "Hi guys"})()}{<span>Thierry</span>}}. The Hi function is self-called.
The following are invalid and cannot be used in a JSX expression:
A variable declaration
A function declaration
An object
An if statement
A loop
We can only use curly braces:
Directly inside a JSX tag:
<h1>{myExpression}</h1>.<{"h1"}></h1>will not work.As attributes (right after the
=sign):<a href={myLink}>Link</a>
Sometimes, we will be constrained to use double curlies. When it comes to passing objects as attributes. You may see this with inline CSS style as example in JSX:
function App() {
  return (
    <div style={{ textAlign: "center" }}>
      <h1>Hello world</h1>
    </div>
  );
}
JSX expressions with conditional operations
Conditional rendering in React refers to the process of displaying components based on certain conditions. It allows you to design dynamic user interfaces that respond to changes in data or user activities. It works the same way conditions work in JavaScript.
There are several ways to implement conditional rendering in React. As with most things in programming, certain approaches are more suited than others depending on the problem you're attempting to address.
In this section, we'll go over the most common methods for implementing conditional rendering in React, as well as some recommendations and best practices.
Let us start with the if...else statement:
To demonstrate, we will implement a component that renders a login form or a dashboard page based on certain conditions:
function App() {
  const isLoged = true;

  if (isLoged) {
    return (
      <div>
        <span>Dashboard page</span>
      </div>
    );
  } else {
    return <div>Login form</div>;
  }
}
With the example above, if isLoged is set to true, the component renders a dashboard page otherwise, it renders the login form.
An if...else blocks is the easiest way to solve this kind of problem, but for a simple use case. Here we are repeating code to rendering (the return statement); you can imagine if we have too many cases to display a different UI. Let us look at techniques to improve this component.
The ternary condition operator in JSX
Instead of using an if...else bloc, we can use the ternary condition operator : condition ? if condition is true : if condition is false. With the ternary operator, your code will be more readable and organized:
function App() {
  const isLoged = true;

  return isLoged ? <div>Dashboard page </div> : <div>Login form</div>;
}
When it comes to using ternary condition inside JSX, the expression is enclosed in curly braces, it will contain JSX, which will be inside parentheses if it is multiline. We can also use the React.fragment element if there is more than one parent element in the expression.
function App() {
  return (
    <section>
      {isLoged ? <div>Dashboard page</div> : <div>Login form</div>}
    </section>
  );
}

// With multiline JSX

function App() {
  return (
    <section>
      {isLoged ? (
        <div>
          <p>Dashboard</p>
        </div>
      ) : (
        <div>
          <p>Login form</p>
          <form action=""></form>
        </div>
      )}
    </section>
  );
}

// With more than one parent element:

function App() {
  return (
    <section>
      {isLoged ? (
        <>
          <header></header>
          <div>
            <p>Dashboard</p>
          </div>
        </>
      ) : (
        <div>
          <p>Login form</p>
          <form action=""></form>
        </div>
      )}
    </section>
  );
}
Prevent rendering with null in React
In some cases, you may not wish to render anything. For example, in your software, you might want to hide a component or a part of your component based on certain conditions. To do that, instead of returning HTML (JSX), you can just return a null value. So, here, we return null because a component must return something. Consider the following component, which displays the user's username if it is connected. We can use either the classic if - else block or the ternary ? : operator:
export default function User() {
  const user = {
    name: "John",
    isConnected: true,
  };

  if (user.isConnected) {
    return <p>Username : {user.name}</p>;
  } else {
    return null;
  }
}

//OR

function User() {
  const user = {
    name: "John",
    isConnected: true,
  };

  return user.isConnected ? <p>Username : {user.name}</p> : null;
}
Logical AND operator (&&)
In some cases, the if - else or the ternary ? : bloc can be simplified. When you want to do (render) something if the condition is true and nothing if the condition is false; you can just use the && operator. The && operator will evaluate the right-hand expression only if the left-hand expression is true.
In React, we can use it like this:
function App() {
  const user = {
    isLogged: false,
    name: "John",
  };

  return <section>{user.isLogged && <Header/>}</section>;
}
If user.isLogged evaluates to true, the <Header/> component will be rendered; if user.isLogged evaluates to false, the <Header/> component will be ignored, and an empty div will be returned.
So, when talking about something to be evaluated as false or true, it doesn't mean only true or false values. Here, all truthy and falsy values in JavaScript are considered.
Consider the following component:
function App() {
  const user = {
    isLogged: false,
    name: "John",
  };

  return (
    <section>
      {user.isLogged ? (
        <header>
          <nav>...</nav>
        </header>
      ) : null}
    </section>
  );
}
We can use the && operator to simplify it:
export default function App() {
  const user = {
    isLogged: true,
    name: "John",
  };

  return (
    <section>
      {user.isLogged && (
        <header>
          <nav>Nav</nav>
        </header>
      )}
    </section>
  );
}
JSX control statements
So far, we have been using JavaScript expressions directly. There are libraries like jsx-control-statementsthat extends JSX to add conditional expressions by transforming component-like control statements to their JavaScript counterparts:
The IF tag:
export default function App() {
  const user = {
    isLogged: true,
    name: "John",
  };

  return (
    <section>
      Username:
      {
        <If condition={user.isLogged}>
          <span>{user.name}</span>
        </If>
      }
    </section>
  );
}
This library is a Babel plugin, the above expression is translated to:
{
    user.isLogged ? <span>{user.name}</span> : null
}
To utilize this library, we must install and include it as a Babel plugin in vite.config.js file:
Installation:
npm install jsx-control-statementsConfiguration:
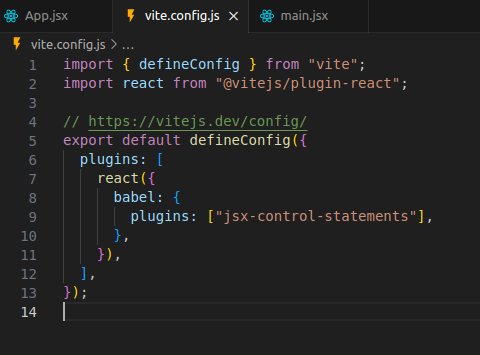
The Choose tag:
This is an alternative syntax for more complex conditional statements.
{
        <Choose>
          <When condition={test1}>
            <div>First blocK</div>
          </When>
          <When condition={test2}>
            <div>Second blocK</div>
          </When>
          <Otherwise>
            <div>Else Block</div>
          </Otherwise>
        </Choose>
}

// its equivalent :

{test1 ? (
        <div>First block</div>
      ) : test2 ? (
        <div>Second block</div>
      ) : (
        <div>Else block</div>
)}
Acts as a basic container, with simply <When/> and <Otherwise/> as children. Each <Choose/> statement must have at least one <When/> block, but it can have as many as it wants. The block <Otherwise/> is optional.
Learn more about jsx-control-statements.
We've learned a lot about JSX in this section. Let us see how we can apply style to our components and create beautiful components.
How to style your React App
Styling in React is similar to styling an HTML, but it has the potential to be much more dynamic.
Apart from the traditional methods of styling, such as adding class and id, direct styling in a CSS file, and so on, you can also apply styles using native JavaScript objects. CSS modules can also be used without any complicated setup. So, you have lots of options. Which do you choose?
I've broken down the five main approaches you may use when developing CSS in your React project!
There is no unique best technique to approach writing styles in React for every project. Every project is unique and has specific needs. That's why I'll go through the benefits and drawbacks of every approach to help you decide which is best for your tasks.
Let us get started!
We'll stylize a user card to observe how the code for each of these style approaches compares:

Inline Styles
Inline styles are the simplest approach for styling any React application. It doesn't require the creation of a separate stylesheet.
export default function App() {
  return <div style={{ padding: "10px" }}>...</div>;
}
Inline CSS is the most preferred but less recommended method of styling your website. This is true not only for React. Even with HTML, adding inline CSS makes future editing tough.
Inline style is the greatest approach to experimenting with various CSS features. One important thing to understand is that inline styles have higher importance and will overwrite any other styles supplied to them in any way.
When we're building a simple website, and you're the only one working on it, inline style is good. Simply said, inline style is a no-no for projects needing large teams. When testing a particular style, inline CSS in React is acceptable.
In short, inline CSS is best suited for learning but not for creating real-world web applications.
Here's why you shouldn't use inline CSS in React:
Inline CSS cannot be reused, which means you must write the same CSS code for the same styles again and over.
Some essential CSS features, such as pseudocodes, pseudo-classes, media queries, and so on, are not permitted to be used in inline styles.
Here is our user card styled with inline styles:
export default function UserCard() {
  return (
    <div
      style={{
        width: "300px",
        backgroundColor: "#f1f1f1",
        padding: "20px",
        borderRadius: "10px",
        textAlign: "center",
      }}
    >
      <img
        src="https://randomuser.me/api/portraits/men/40.jpg"
        alt="User Avatar"
        style={{
          width: "150px",
          height: "150px",
          borderRadius: "50%",
          margin: "0 auto 10px",
        }}
      />
      <h3 style={{ margin: "10px 0" }}>John Doe</h3>
      <p>johndoe@example.com</p>
      <a
        href="#"
        style={{
          display: "inline-block",
          padding: "10px 20px",
          backgroundColor: "#4caf50",
          color: "white",
          textDecoration: "none",
          borderRadius: "5px",
          marginTop: "15px",
        }}
      >
        Follow
      </a>
    </div>
  );
}
External CSS
Instead of applying inline styles, it is common to import a CSS stylesheet at the top of a component. This is one of the most common ways to write CSS in React.
The benefit of using external stylesheets is that we have total control over the CSS properties (for example, pseudo-selectors, media queries), which is not possible with React's inline CSS.
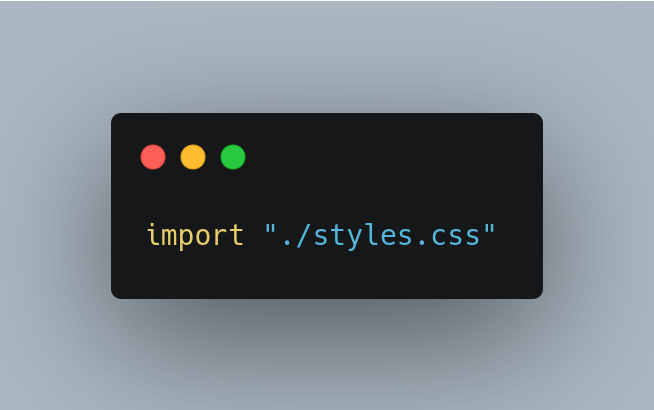
All we need to do here is create a file with a .css extension and import it into the React file.
Now, we can specify which styles should point to which element by using any CSS selector.
Here, instead of using class for style, we will use className.
class is a reserved keyword in JavaScript and since we use JSX in React which itself is a JavaScript library, we have to use another keyword.One thing we should pay attention to is the naming standard for classes and IDs. If we are building a complicated web UI, we may unknowingly create multiple className with the same name. The solution to that difficulty is a naming convention!
CSS selectors are written in various ways by different teams. Some teams use hyphens as delimiters, while others prefer more organized naming conventions such as BEM, SMACSS, Atomic CSS, OOCSS, or Utility Classes according to their project. I am going to show you how SMACSS works:
The goal of SMACSS is to divide your CSS into five categories: base, layout, module, state, and theme. Another distinguishing feature of SMACSS is that it encourages you to divide your CSS into five separate files so that the rules do not mistakenly migrate into the various parts. This makes it easier to track down a specific piece of CSS based on its category.
Base
A Base rule is applied to an element using an element selector, a descendant selector, or a child selector, as well as any pseudo-classes. It does not contain any class or ID selectors. It defines the default style for how that element will look in all instances on the page:
 body,
 form {
   margin: 0;
   padding: 0;
 }

 a {
   text-decoration: none;
 }

 a:hover {
   color: #03f;
 }
Layout
Layouts are standalone parts of your UI such as header, footer, articles, .... There is, however, a distinction between layouts that determine the primary and minor components of a page. Minor components, such as a callout, login form, or navigation item, are within the scope of big components, such as a header or footer.
Major layout styles, like the header and footer, are generally styled with ID selectors, but take the time to consider the elements that are shared by all components of the page and utilize class selectors when applicable:
 #header,
 #article,
 #footer {
   width: 500px;
   margin: 10px;
 }

 #article {
   border: solid #eeeeee;
   border: solid black 1px;
 }
Modules
Modules are included within Layout components. They can occasionally be found within other Modules. Each Module should be built to function independently. As a result, the page will be more adaptable. Modules may be easily relocated to other portions of the layout without breaking if done correctly.
Avoid using IDs and element selectors when defining a module's rule set, utilise class names. A module will very certainly include several items, and it is most likely desirable to target those elements using descendant or child selectors:
.module > h2 { padding: 5px; } .module span { padding: 5px; }State:
A state is everything that supplements all other styles. An accordion portion, for example, can be collapsed or expanded. The message can be in either a successful or unsuccessful condition.
Theme:
The theme is all the other additional decorative visual elements that make your webpage unique. This includes all your main colours, shapes, borders, shadows, and branding-related things.
Here are our user card styles written in separate .css file and imported at the top of our component:
/* app.css */

.user-card {
  width: 300px;
  background-color: #f1f1f1;
  padding: 20px;
  border-radius: 10px;
  text-align: center;
}

.user-card > img {
  width: 150px;
  height: 150px;
  border-radius: 50%;
  margin: 0 auto 10px;
}

.user-card > h3 {
  margin: 10px 0;
}

.user-card > a {
  display: inline-block;
  padding: 10px 20px;
  background-color: #4caf50;
  color: white;
  text-decoration: none;
  border-radius: 5px;
  margin-top: 15px;
}
// app.jsx

import "./app.css"; // <== Loads styles

export default function UserCard() {
  return (
    <div className="user-card">
      <img
        src="https://randomuser.me/api/portraits/men/40.jpg"
        alt="User Avatar"
      />
      <h3>John Doe</h3>
      <p>johndoe@example.com</p>
      <a href="#">Follow</a>
    </div>
  );
}
CSS Modules
CSS modules are .module.css files in which all class and animation names are scoped locally by default. In contrast, all CSS selectors in a conventional CSS file are in the global scope.
CSS Modules compile to a low-level interchange format called ICSS, or Interoperable CSS, but are created like regular CSS files:
.user-card {
  width: 300px;
  background-color: #f1f1f1;
  padding: 20px;
  border-radius: 10px;
  text-align: center;
}
When importing the CSS Module from a JS Module, it exports an object containing all mappings from local names to global names:
/* app.module.css */

.user_card {
  width: 300px;
  background-color: #f1f1f1;
  padding: 20px;
  border-radius: 10px;
  text-align: center;
}

.user_card > img {
  width: 150px;
  height: 150px;
  border-radius: 50%;
  margin: 0 auto 10px;
}

.user_card > h3 {
  margin: 10px 0;
}

.user_card > a {
  display: inline-block;
  padding: 10px 20px;
  background-color: #4caf50;
  color: white;
  text-decoration: none;
  border-radius: 5px;
  margin-top: 15px;
}
// app.jsx
import style from "./app.module.css";

// or import {user_card} from './app.module.css'

export default function UserCard() {
  return (
    <div className={style.user_card}>
      <img
        src="https://randomuser.me/api/portraits/men/40.jpg"
        alt="User Avatar"
      />
      <h3>John Doe</h3>
      <p>johndoe@example.com</p>
      <a href="#">Follow</a>
    </div>
  );
}
CSS in JavaScript
CSS-in-JS is one technique for writing CSS that attempts to reduce some of the limitations of plain CSS, such as scoping, portability, and dynamic functionality. A well-designed CSS-in-JS library will bring together all of its CSS attributes and dependencies. All style logic is now separated and reusable.
Here is an example of a quicker CSS in JS library, Styled Components:
Styled components
It allows you to employ component-level styles in your application. It means you can create styles for specific UI components. styled-components is a JavaScript and CSS (CSS-in-JS) combination.
Installation:
npm install styled-componentUsage:
```javascript import style from "styled-components";
const Button = style.button` display: inline-block; padding: 10px 20px; background-color: #4caf50; color: white; text-decoration: none; border-radius: 5px; margin-top: 15px;
&:hover{ background-color: red; } `;
export default function () { return Create an account; }

Here are our user card styles written with `styled-components`, a CSS in JS library:
```javascript
import style from "styled-components";
const Card = style.div`
width: 300px;
background-color: #f1f1f1;
padding: 20px;
border-radius: 10px;
text-align: center;
> img {
width: 150px;
border-radius: 50%;
margin: 0 auto 10px;
height: 150px;
}
> h3 {
margin: 10px 0;
}
> a {
display: inline-block;
padding: 10px 20px;
background-color: #4caf50;
color: white;
text-decoration: none;
border-radius: 5px;
margin-top: 15px;
}
`;
export default function UserCard() {
return (
<Card>
<img
src="https://randomuser.me/api/portraits/men/40.jpg"
alt="User Avatar"
/>
<H3>John Doe</H3>
<p>johndoe@example.com</p>
<a href="#">Follow</a>
</Card>
);
}
JSX Styled
Styled JSX is also a CSS-in-JS library that allows you to style your components with encapsulated and scoped CSS. Styles introduced for one component do not influence other components, allowing you to add, update, and delete styles without worrying about unexpected consequences.
Styled-JSX is a small (3kb) library created and maintained by Next.js. It has gained enormous popularity in recent years.
It's as easy as inserting a <style jsx> tag into an existing React element and writing CSS inside.
Here is our user card with JXS Styled:
export default function UserCard() {
  return (
    <div className="user-card">
      <img
        src="https://randomuser.me/api/portraits/men/40.jpg"
        alt="User Avatar"
      />
      <h3>John Doe</h3>
      <p>johndoe@example.com</p>
      <a href="#">Follow</a>

      <style jsx>{`
        .user-card {
          background-color: #f1f1f1;
          padding: 20px;
          border-radius: 10px;
          text-align: center;
          width: 300px;
        }

        h3 {
          margin: 10px 0;
        }

        a {
          display: inline-block;
          padding: 10px 20px;
          background-color: #4caf50;
          color: white;
          text-decoration: none;
          border-radius: 5px;
          margin-top: 15px;
        }

        img {
          width: 150px;
          height: 150px;
          border-radius: 50%;
          margin: 0 auto 10px;
        }
      `}</style>
    </div>
  );
}
We looked at how to make our application seem beautiful and interesting in this section. We not only experimented with CSS style in React, but we also explored several recommended practices to follow. You now understand how to style your application most effectively and efficiently.
The choice of styling approach will depend on your needs, skills, and tastes. You can even combine several styling approaches in your React app.
Please keep in mind that I did not add libraries like Tailwind, Bootstrap,... I wanted to focus on different ways of writing vanilla CSS. Libraries with pre-made components and styles, such as Material UI or Ant Design (to mention a few), are also a completely practical option for your project.
So, now we are good to start working on our final exercise; the touché website. It is a static website. We are going to use React concepts such as the component architecture approach; JSX, JavaScript in JSX, conditional rendering, ...; one of the listed approaches to style a React app, and some ECS6 features learned in the first part of this article.
I am going to walk you through the essentials and then let you complete the exercise on your own. If you get stuck, feel free to reach out to me or in the comments section, or you may figure it out yourself by comparing your code to what's in the GitHub repo.

Create the project with
create vite:If it is your first time, i suggest you to read the first article.
Open your terminal:
Create the folder for the project :
mkdir touche-projectChange the working directory to the project folder :
cd touche-projectCreate the project:
npm create vite@latest .Don't forget the
.! The create vite command will consider the current folder to be the folder's project and will not create another.Install all added dependencies :
npm installRun the initial app to test :
npm run devOpen the local adress : http://localhost:5173/
You should get this:

Here we go !
Are you ready ?

Now open your folder with any IDE of your choice.
Let us delete the .eslintrc.cjs file since we don't need it at this time and clean up the src folder except main.jsx so that we can start by ourselves.
Next step, create the
App.jsxfile and thestylesfolder in which we will put everything related to styles. TheApp.jsxwill contain stand-alone parts of the application (header, hero, footer, ...) as component, in thestylesfolder, create theindex.cssfile which will contain the initial (base) styles and some global styles of the website.We are going to use the CSS modules approach to apply styles to our website!
Now create a simple component in
App.jsxand name itApp, return amaintag inside it you can write anything inside themaintag for testing (e.g: App). Don't forget to export it.Add the base and globals styles inside the
index.css, you can find them here. Take your time to check and improve if needed.Inside the styles folder create the fonts folder which contains fonts families for our website, you can find them here.
Rewrite how the main.jsx import styles:
  ...
  import './index.css'
  ...
to:
  ...
  import './styles/index.css'
  ...
Now you should got this:

Next step, Design the header component:
As our website is responsive, we need an hamburger menu for mobile views. I have wanted it to be a separated component. So, inside the
srcfolder create thecomponentsfolder which will contain all components for our website.As the hamburger is in the header scope, we will create a folder called
headerand inside it create thehamburger.jsxfile which contains the hamburger menu component and theindex.jsxfile which contains the header component.💡If no specification is supplied, a directory links to its index module file. We could import the header component like this:import Header from "./components/header"; // Default exportHamburger menu component:
 export default function Hamburger() {
   return (
     <div>
       <div></div>
       <div></div>
       <div></div>
     </div>
   );
 }
It takes the form of an icon that consists of three parallel horizontal lines (displayed as ≡).
For styling, as mentioned, we will use the CSS modules approach. So, we will be creating a
.module.cssfile for each component and import it at the top of the component.In the
stylesfolder, create a folder which will hold all component stylesheet module, name itcomponents. Then, inside thecomponentsfolder (in the styles folder), create a folder calledheader, inside it, create ahamburger.module.cssfile for the hamburger's styles and aindex.module.cssfile for the header's styles. It just like the component folder's structure but now for styles.Here is the styles for the hamburger
Import the stylesheet module and applu styles to the JSX:
  import styles from "../../styles/components/header/hamburger.module.css";

  export default function Hamburger() {
    return (
      <div className={styles["hamburger"]}>
        <div className={styles["hamburger-line"]}></div>
        <div className={styles["hamburger-line"]}></div>
        <div className={styles["hamburger-line"]}></div>
      </div>
    );
  }
We are done with the hamburger menu component!
Let us now design the header:

We only have a logo and a few navigation menus. However, I wanted the navigation menus to be in a separate file as data so that we could change them (add or delete) and keep the same structure for our header component.
To do so, let us create a data folder in src, it will contain all data for our website (menus, gallery images, team members, ...). Inside the data folder, create the header folder that contains the menu.js file in which we have ours navigation menus. You can find the structure here.
After creating the navigation menus, make sure to export them so that we can import them and use them in another module (the header component).
In the header component, we are going to add the logo, map the navigation menus data and return a li for each menus in a ul tag. Each li will contain a a tag with href attribute to point to a section in the web page to allow users to navigate. To point to a section in the same HTLM document, start with a # and then add the id of the section you wish to navigate as value of href : <a href="#about"></a>.
And then, add the hamburger menu in the header component.
- Here is the styles for the header component.
    import { menus } from "../../data/header/menus";
    import styles from "../../styles/components/header/index.module.css";

    import Hamburger from "./hamburger";
    export default function Header() {
      return (
        <header className={styles["header"]}>
          <a className={styles.logo} href="#intro">
            <span>Touché</span>
          </a>

          <ul className={styles["navigation"]}>
            {menus.map((menu) => {
              return (
                <li key={menu.title} className={styles["navigation-item"]}>
                  <a key={menu.title} href={menu.link}>
                    {menu.title}
                  </a>
                </li>
              );
            })}
          </ul>
          <Hamburger />
        </header>
      );
    }
Design the hero:
Now, we have an idea of the structure. We are going to follow it for all component.
Create the component in the component folder.
Create the
hero.module.cssstylesheet in the styles/components folder and import it at the top.Here is the styles.
For the backgroung image, in the
srcfolder, create anassetsfolder which is going to contain all assets for the website (icons, images). Inside the assets folder create animagesfolder and add this image.
    import styles from "../styles/components/hero.module.css";

    export default function Hero() {
      return (
        <div id="intro" className={styles["hero"]}>
          <div className={styles["intro"]}>
            <div className={styles["tag-line-container"]}>
              <span className={styles["brand"]}>Touché</span>
              <span className={styles["tag-line"]}>Restaurant / Coffee / Pub</span>
            </div>
            <a href="#about">
              <button className="btn btn-primary">Discover Story</button>
            </a>
          </div>
        </div>
      );
    }
Now, should have this:

🥳🥳🥳 Congratulations !!!! You did it 💯 💯 💯!!!!

I believe you are now ready to continue. So go ahead and do it!
Once you complete this exercise, leave a comment to congratulate yourself.
We learned a lot about JSX in this post, including how to return complex JSX, transpilling principles, conditional rendering, and multiple techniques for applying styles to a react component. We also learned a lot about ECS6 features. As part of it, we noticed several best practices for react app performance and maintenance. We can now use react to create a static website.
In the next articles, we will learn how to add interactivity to a React application and how to handle events. We'll also introduce react hooks and learn the concepts of higher-order components, props, and states.
Have you liked this reading? Connect with me on Twitter, LinkedIn, and GitHub for more articles like this.
Thank you for reading and sharing this with your network.
See you in the next part 💯.


